Get artistic with PowerPoint 2010 picture editing
PowerPoint 2010 provides a multitude of options when including photographs in your presentations. Begin experimenting by going to the Insert tab, Images group, and click the picture icon. Choose the picture you would like to work on. A good example to practice on is one from the Sample Pictures (Windows 7) called Tulips.
Color
Since PowerPoint 2007, we have had the Recolor options, allowing the entire picture to be changed to a single color, such as sepia. Recolor options (Picture Tools Format contextual tab, the Adjust group Color button) now include various black and white selections, as well. Choose Washout to have a picture become a background on a single slide or one of the lighter variations of a single color. PowerPoint 2010 now has Color Tone and Saturation choices. If you’ve worked with programs like Adobe Photoshop, you may be familiar with how these attributes behave.
If not, here’s a brief explanation.
- Tone: Think cool to hot. A cooler tone would have less brightness in the colors. The “hotter” setting would actually look sunnier if we were looking at the tulips.
- Saturation: With watercolor painting, one stroke gives a hint of color, two make the color more vivid. The far left of the Saturation spectrum is actually grayscale, or no color saturation.

Artistic effects
Would you like your photo to resemble a work of art, like a watercolor or pencil sketch? In Photoshop, these are called filters. PowerPoint doesn’t offer as robust a selection as Photoshop, but it does offer many creative choices. Click the Artistic Effects button to choose. The gallery allows you to hover over a selection and see what the effect would be on your photo. To make it look more like an illustration, try Cutout or Line Drawing. For something a bit more “psychedelic,” try Glow Edges or Plastic Wrap.
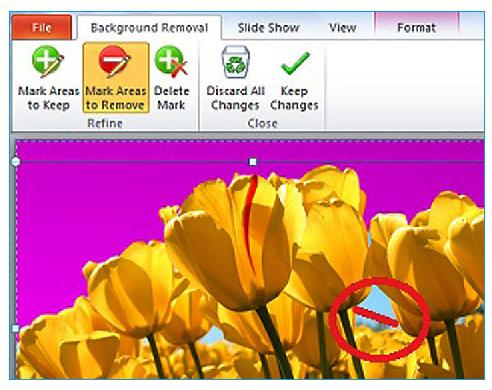
Remove background
This tool, while quite simple to use, can seem more cumbersome than it is. Say you want to remove the sky from the Tulips picture. First, click the Remove Background button. You’ll notice that a shape with sizing handles appears, with the background shaded in magenta. Magenta represents the parts that would be removed. Here are the steps to remove just the sky.
- Drag the shape until it includes all the flowers. This involves stretching it width-wise to include the whole width of the photo and shortening the shape so it includes all but the top part of the photo, which only contained sky.
- Fine tune and remove the sections of sky between the flowers by zooming in a bit using the zoom slide bar in the bottom right of the screen.
- Use the Mark Areas to Remove tool from your new Background Removal Ribbon tab and draw lines across the middle of the remaining blue areas. You do not need to outline these areas.
- Click the Keep Changes button to complete your changes.